Some time ago we created an open-source image cropping library for Android. uCrop is a convenient tool for cropping photos that you can use for your project. Since its creation, the tool has received much attention from the GitHub community and has reached a leading position in the GitHub trending repositories list. As of September 14, 2020, there were more than 11 billion uCrop downloads and more than 14 thousand of apps using uCrop.
In our previous article, we’ve made an overview of our library and told what incentivized us to create uCrop. Now it’s time, to dig into some of the technical details of developing uCrop. Hopefully after reading this article cropping images on Android will become easier than ever!
The uCrop Challenge
I started the project by defining a set of features. They are pretty straightforward:
-
cropping images
-
supporting any crop aspect ratio
-
scaling, translating, and rotating images using gestures
-
preventing an image from leaving an empty space inside the crop bounds
-
creating a ready-to-use crop Activity, and making it possible to use the underlying Crop view on its own. In other words, the library includes an Activity which, in turn, includes a Crop view and some additional widgets.
Crop view
Considering the set of features I planned to build, I decided to divide the view logic into three layers.
1. TransformImageView extends ImageView.
It must:
-
Set an image from the source.
-
Transform (translate, scale and rotate) the matrix applied to the current image.
This layer does not know about crop or about touch gestures.
2. CropImageView extends TransformImageView.
This includes:
2.1. Drawing crop boundaries and grid.
2.2. Setting an image for crop boundaries (if user pans out or rotates the image making empty space appear within the crop frame, the image will be moved or/and scaled back to fit the crop boundaries automatically leaving no empty spaces)
2.3. Extending methods to transform the matrix with more specific rules (limit the minimum and maximum scales, etc.)
2.4. Adding methods to zoom in and out (animating transformations)
2.5. Cropping images.
This layer has almost everything we need to transform and crop images. But it only specifies methods to do all these things, and we need to support gestures as well.
3. GestureImageView extends CropImageView.
The function of this layer is to:
3.1. Listen to user gestures and call proper methods.
TransformImageView
This was the easiest part.
First, I took an Uri and decoded a properly sized bitmap from it. I started by obtaining the FileDescriptor:
ParcelFileDescriptor parcelFileDescriptor = context.getContentResolver().openFileDescriptor(uri, "r");

FileDescriptor fileDescriptor = parcelFileDescriptor.getFileDescriptor();
Now, it became possible to use BitmapFactory methods to decode the FileDescriptor.
But before decoding the bitmap, it’s necessary to know its size, because in case a resolution is too high, the bitmap will be subsampled.
final BitmapFactory.Options options = new BitmapFactory.Options();


options.inJustDecodeBounds = true;

BitmapFactory.decodeFileDescriptor(fileDescriptor, null, options);

options.inSampleSize = calculateInSampleSize(options, requiredWidth, requiredHeight);

options.inJustDecodeBounds = false;


Bitmap decodeSampledBitmap = BitmapFactory.decodeFileDescriptor(fileDescriptor, null, options);

close(parcelFileDescriptor);


ExifInterface exif = getExif(uri);

if (exif != null) {

  int exifOrientation = exif.getAttributeInt(ExifInterface.TAG_ORIENTATION, ExifInterface.ORIENTATION_NORMAL);

  return rotateBitmap(decodeSampledBitmap, exifToDegrees(exifOrientation));

} else {

  return decodeSampledBitmap;

}
Here I will point out two interesting things about the bitmap size.
1. How did I set up the required width/height of an image?
The calculateInSampleSize(options, requiredWidth, requiredHeight) method calculates the SampleSize based on the rule that neither side of an image will exceed the required values.
How do you find the required width/height of an image? Some developers use constants (for example, one of the crop libraries uses 1000px as a maximum bitmap size). However, with so many Android devices, figuring out a single constant to fit all the screens doesn’t seem like the best approach. I could also use a view size, or calculate the bitmap size taking into account currently available memory. However, using a view size wouldn’t work in my case, because users don’t just look at the image: they scale it, so I needed to have some resolution reserve. There are also more complex techniques for achieving the best balance between memory and image quality.
After a little research I decided to use screen diagonal of a device as a maximum bitmap width and height. Using screen diagonal is a universal value. There are devices with high display density, big screens, and powerful hardware and less powerful, old, or cheap devices with small, low resolution screens, and less productive hardware. If a device handles its own screen, it will definitely handle a bitmap downscaled to the size of that screen.
I tested this approach on our Android devices from Android 2.3.3 crap-phones with ldpi screens all the way up to a brand new Nexus 9 with its huge and awesome 9-inch screen, and I was quite satisfied with the memory-quality balance I achieved. If there is anything wrong with image sizes, you can change this value via builder or by setting it directly to the view.
2. How did I apply transformation to the matrix, and the updated matrix to the view?
I created three methods for changing: (1) image position, (2) scale and (3) rotation angle. For example, let’s look at the method for image scaling:
public void postScale(float deltaScale, float px, float py) {

  if (deltaScale != 0) {

      mCurrentImageMatrix.postScale(deltaScale, deltaScale, px, py);

      setImageMatrix(mCurrentImageMatrix);

  }

}
Nothing fancy here: these methods simply check whether a given value is non-zero, and apply it to the current image matrix.
Because I overrode the setImageMatrix() method, it calls a superclass method with a given matrix and also calls the updateCurrentImagePoints() method which in turn updates several variables that will be needed in the CropImageView class.
The TransformImageView logic was ready, and I started to implement more interesting and challenging part of the library.
CropImageView
Crop guidelines
The first thing I added on top of the TransformImageView is crop guidelines. This is very helpful when you want to adjust the position of an image in relation to the center and X/Y axes.
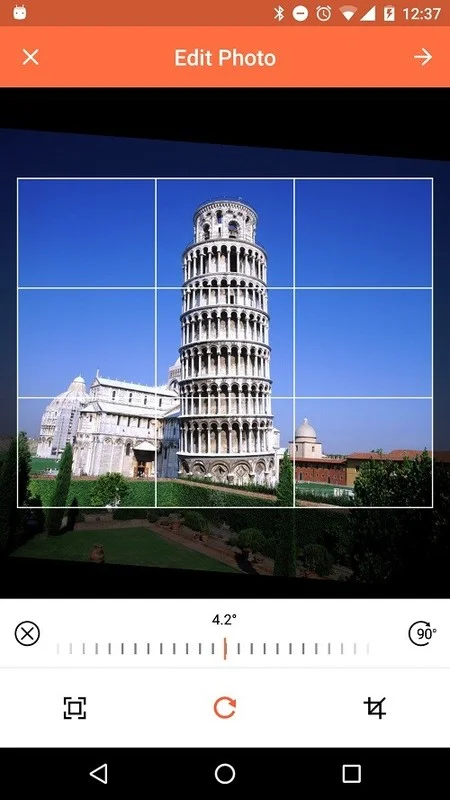
Image guidelines are formed by a rectangle, with horizontal and vertical lines within it. Drawing lines on the canvas is easy, and if you have some troubles doing this, you can find lots of information on the internet. Or you can check our open source project to see how this is implemented.
The only other thing that I want to mention about crop guidelines is that I calculated the crop boundaries taking paddings into account. Furthermore, I dimmed the area around the whole crop rectangle to better indicate which area will get cropped, and which area won’t.
Make sure that there is no empty space within the crop boundaries
My idea was that a user must be able to move, rotate and scale an image (performing all three of these actions simultaneously). Also, there must be no empty space within the crop boundaries when a user releases the image. How did I achieve this? There were two potential solutions:
-
Limit image translation by the crop bounds, so that a user cannot downscale, rotate or move an image if it’s already at the edge of the crop bounds.
-
Let a user move the image freely, but correlate its position and size automatically when the image is released.
The first option is a bad UX practice, so I chose the second.
Thus, I had to solve two problems: (1) how to detect if the space within the crop bounds is filled by image; (2) how to calculate all needed transformations to be able to return the image within the bounds as necessary.
Check if the image fills the crop bounds
To begin, we have two rectangles: the crop bounds and the image. The image must fit within the crop bounds such that the crop rectangle is entirely inside the image rectangle; at minimum, their edges must meet. It’s a pretty simple task when both rectangles are axis-aligned: just call the contains() method of Rect class and you’re done. But in my case, the image rectangle can be rotated freely. What a bummer!
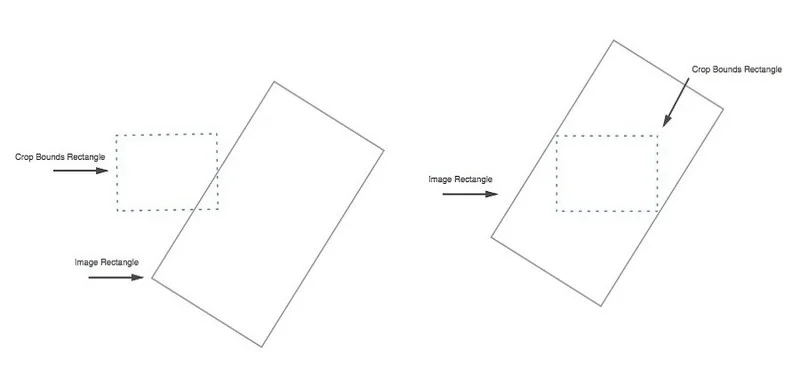
At first, I puzzled over how to detect if a rotated rectangle covers an axis-aligned rectangle. Then I recalled my good old trigonometry course and started wasting some paper to make calculations. But suddenly I realized that this problem can be solved more easily if I invert the question: How can I detect if the axis-aligned rectangle covers the rotated rectangle?
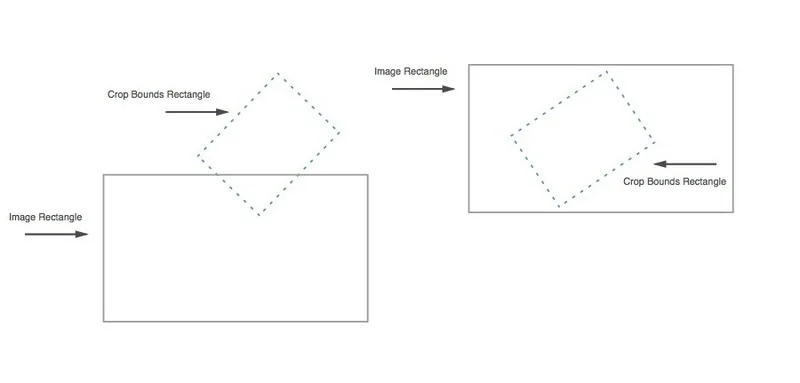
Now that seems not so hard! I just needed to figure out if all four corners of the crop bounds rectangle were inside the image rectangle.
The mCropRect variable was already defined, so the only thing I needed was a set of image corner points.
I talked about the setImageMatrix(Matrix matrix) method previously. Within this method there was a call to updateCurrentImagePoints() that makes use of the matrix mapPoints method.
private void updateCurrentImagePoints() {

  mCurrentImageMatrix.mapPoints(mCurrentImageCorners, mInitialImageCorners);

  mCurrentImageMatrix.mapPoints(mCurrentImageCenter, mInitialImageCenter);

}
Each time an image matrix is changed, I have the image center and image corner points updated. So, finally, I was able to write the method to check whether the current image covers the crop bounds:
protected boolean isImageWrapCropBounds() {
   mTempMatrix.reset();
   mTempMatrix.setRotate(-getCurrentAngle());

   float[] unrotatedImageCorners = Arrays.copyOf(mCurrentImageCorners, mCurrentImageCorners.length);
   mTempMatrix.mapPoints(unrotatedImageCorners);

   float[] unrotatedCropBoundsCorners = CropMath.getCornersFromRect(mCropRect);
   mTempMatrix.mapPoints(unrotatedCropBoundsCorners);

   return CropMath.trapToRect(unrotatedImageCorners).contains(CropMath.trapToRect(unrotatedCropBoundsCorners));
}
Basically, I used a temporary Matrix object to un-rotate both crop bounds and image corner points and then used the RectF class contains(RectF rect) method to check whether the crop bounds lie entirely within the image. That did the trick.
Transform the image so it wraps the crop bounds
First, I found the distance between the center of the current image and the center of the crop bounds. Then, using a temporary matrix and variables I translated the current image to the crop bounds center and checked if it would fill the crop bounds:
float oldX = mCurrentImageCenter[0];

float oldY = mCurrentImageCenter[1];
float deltaX = mCropRect.centerX() - oldX;

float deltaY = mCropRect.centerY() - oldY;

mTempMatrix.reset();

mTempMatrix.setTranslate(deltaX, deltaY);


float[] tempCurrentImageCorners = Arrays.copyOf(mCurrentImageCorners, mCurrentImageCorners.length);

mTempMatrix.mapPoints(tempCurrentImageCorners);


boolean willImageWrapCropBoundsAfterTranslate = isImageWrapCropBounds(tempCurrentImageCorners);
This is important because if an image won’t completely fill the crop bounds, then matrix translation transformation must be applied along with scale transformation.

Therefore, I added code to calculate the delta scale:
float currentScale = getCurrentScale();

float deltaScale = 0;

if (!willImageWrapCropBoundsAfterTranslate) {

  RectF tempCropRect = new RectF(mCropRect);

  mTempMatrix.reset();

  mTempMatrix.setRotate(getCurrentAngle());

  mTempMatrix.mapRect(tempCropRect);


  float[] currentImageSides = RectUtils.getRectSidesFromCorners(mCurrentImageCorners);


  deltaScale = Math.max(tempCropRect.width() / currentImageSides[0],

          tempCropRect.height() / currentImageSides[1]);

  deltaScale = deltaScale * currentScale - currentScale;

}
First, I rotated and mapped the crop bounds rectangle into a temporary variable. Next I created a method inside the RectUtils class to calculate sides of the rotated rectangle using its corner coordinates:
public static float[] getRectSidesFromCorners(float[] corners) {

  return new float[]{(float) Math.sqrt(Math.pow(corners[0] - corners[2], 2) + Math.pow(corners[1] - corners[3], 2)),

          (float) Math.sqrt(Math.pow(corners[2] - corners[4], 2) + Math.pow(corners[3] - corners[5], 2))};

}
Using this method I got width and height of the current image.
Finally, I wrote a proportion to find out desired delta scale.
Now I had both values to move and scale the image (if needed). So I wrote a Runnable task to make it live!
I’ll skip to the run() method here:
@Override
public void run() {


  long now = System.currentTimeMillis();

  float currentMs = Math.min(mDurationMs, now - mStartTime);


  float newX = CubicEasing.easeOut(currentMs, 0, mCenterDiffX, mDurationMs);

  float newY = CubicEasing.easeOut(currentMs, 0, mCenterDiffY, mDurationMs);

  float newScale = CubicEasing.easeInOut(currentMs, 0, mDeltaScale, mDurationMs);


  if (currentMs < mDurationMs) {

      cropImageView.postTranslate(newX - (cropImageView.mCurrentImageCenter[0] - mOldX), newY - (cropImageView.mCurrentImageCenter[1] - mOldY));

      if (!mWillBeImageInBoundsAfterTranslate) {

          cropImageView.zoomInImage(mOldScale + newScale, cropImageView.mCropRect.centerX(), cropImageView.mCropRect.centerY());

      }

      if (!cropImageView.isImageWrapCropBounds()) {

          cropImageView.post(this);

      }

  }

}
Here I calculated current time that passed, and, using the CubicEasing class, I interpolated both translate (x, y) and scale values. Using interpolated values really improves your animations, making them more natural to the human eye.
Finally, those values are applied to the image matrix. A Runnable terminates when either context is null, time is out, or the image fills the crop bounds.

Crop the image
Eventually, I came to the point where (surprise!) I needed to crop an image. Kind of a crucial feature, because without it, this library can be thrown away.
I started by obtaining current values needed for the following calculations:
Bitmap viewBitmap = getViewBitmap();
if (viewBitmap == null) {
    return null;
}

cancelAllAnimations();
setImageToWrapCropBounds(false); // without animation

RectF currentImageRect = RectUtils.trapToRect(mCurrentImageCorners);
if (currentImageRect.isEmpty()) {
    return null;
}

float currentScale = getCurrentScale();
float currentAngle = getCurrentAngle();
Bitmap that will be cropped, current rectangle that represents a transformed image on the screen, current scale, and rotation angle. Validate them and continue to the next step:
if (mMaxResultImageSizeX > 0 && mMaxResultImageSizeY > 0) {

  float cropWidth = mCropRect.width() / currentScale;

  float cropHeight = mCropRect.height() / currentScale;


  if (cropWidth > mMaxResultImageSizeX || cropHeight > mMaxResultImageSizeY) {


      float scaleX = mMaxResultImageSizeX / cropWidth;

      float scaleY = mMaxResultImageSizeY / cropHeight;

      float resizeScale = Math.min(scaleX, scaleY);


      Bitmap resizedBitmap = Bitmap.createScaledBitmap(viewBitmap,

              (int) (viewBitmap.getWidth() * resizeScale),

              (int) (viewBitmap.getHeight() * resizeScale), false);

      viewBitmap.recycle();

      viewBitmap = resizedBitmap;


      currentScale /= resizeScale;

  }

}
I made it possible to set maximum values for output (cropped image result) width and height. For example, you if you use the library to crop a photo for your user profile and you might want a maximum width and height of 500px.
In the above code block, I checked whether these maximum values were specified and if the cropped image is larger than those values. When there is a need to downscale the image, I use the Bitmap.createScaledBitmap method, and then recycle original Bitmap and apply downscale to the currentScale value so further calculations won’t be affected.
Now, it’s time to check whether the image was rotated:
if (currentAngle != 0) {

  mTempMatrix.reset();

  mTempMatrix.setRotate(currentAngle, viewBitmap.getWidth() / 2, viewBitmap.getHeight() / 2);


  Bitmap rotatedBitmap = Bitmap.createBitmap(viewBitmap, 0, 0, viewBitmap.getWidth(), viewBitmap.getHeight(),

          mTempMatrix, true);

  viewBitmap.recycle();

  viewBitmap = rotatedBitmap;

}
Same here: if the currentAngle is not 0 I use the Bitmap.createBitmap method to rotate the current Bitmap and then recycle it (no one likes OutOfMemoryException).
And, finally, I calculated coordinates of the rectangle that must be cropped from the image:
int top = (int) ((mCropRect.top - currentImageRect.top) / currentScale);

int left = (int) ((mCropRect.left - currentImageRect.left) / currentScale);

int width = (int) (mCropRect.width() / currentScale);

int height = (int) (mCropRect.height() / currentScale);


Bitmap croppedBitmap = Bitmap.createBitmap(viewBitmap, left, top, width, height);
There’s really nothing sophisticated here. I just took into account the currentScale value and used the Bitmap.createBitmap method. Thanks to the above methods, the resulting Bitmap must be rotated and scaled properly.
GestureImageView
This layer was created right after I added methods to move, rotate, and scale an image in TransformImageView, because it was essential for testing, debugging, UX tuning, and getting feedback as early as possible. Of course, gesture logic and supported gestures were changing and improving with the library development progress.
Once again, let’s see what gestures I needed to support:
1. Zoom gestures
Image must respond to a couple of gestures that can change their zoom level:
-
Double tap to zoom in
-
Two finger pinch/stretch.
2. Scroll (pan) gestures
A user can scroll (pan) the image by dragging their finger.
3. Rotate gestures
A user can rotate the image by placing two fingers on the image and making a rotating motion.
Moreover, all these gestures must be able to work all in at the same time, and all image transformations must be applied in relation to the focal point between a user’s fingers, so it would feel like you literally drag an image around on your device screen.
Luckily, Android SDK provides us developers with two handy classes: GestureDetector and ScaleGestureDetector. Both classes have interfaces, and I was interested in onScroll, onScale and onDoubleTap callbacks. In short, I had everything but the rotation detection solution. Unfortunately, there is no built-in rotation gesture detection in the SDK, but after some research I managed to create one based on some articles and StackOverflow answers.
Now, let’s see some code.
First, I defined the gesture listeners:
private class ScaleListener extends ScaleGestureDetector.SimpleOnScaleGestureListener

  @Override

  public boolean onScale(ScaleGestureDetector detector) {

      postScale(detector.getScaleFactor(), mMidPntX, mMidPntY);

      return true;

  }

}


private class GestureListener extends GestureDetector.SimpleOnGestureListener {

  @Override

  public boolean onDoubleTap(MotionEvent e) {

      zoomImageToPosition(getDoubleTapTargetScale(), e.getX(), e.getY(), DOUBLE_TAP_ZOOM_DURATION);

      return super.onDoubleTap(e);

  }


  @Override

  public boolean onScroll(MotionEvent e1, MotionEvent e2, float distanceX, float distanceY) {

      postTranslate(-distanceX, -distanceY);

      return true;

  }

}


private class RotateListener extends RotationGestureDetector.SimpleOnRotationGestureListener {

  @Override

  public boolean onRotation(RotationGestureDetector rotationDetector) {

      postRotate(rotationDetector.getAngle(), mMidPntX, mMidPntY);

      return true;

  }

}
Next, I created detector objects and specified the listeners that were defined above:
private void setupGestureListeners() {

  mGestureDetector = new GestureDetector(getContext(), new GestureListener(), null, true);

  mScaleDetector = new ScaleGestureDetector(getContext(), new ScaleListener());

  mRotateDetector = new RotationGestureDetector(new RotateListener());

}
You can now notice mMidPntX, mMidPntY variables and getDoubleTapTargetScale() method that is not defined yet. Basically, mMidPntX and mMidPntY are coordinates of the current point between two fingers on the device screen that help the image matrix apply image transformations properly. The getDoubleTapTargetScale() method calculates scale value based on the mDoubleTapScaleSteps variable.
protected float getDoubleTapTargetScale() {

  return getCurrentScale() * (float) Math.pow(getMaxScale() / getMinScale(), 1.0f / mDoubleTapScaleSteps);

}
For example, the default mDoubleTapScaleSteps value is 5, so a user is able to zoom in the image from the min scale value to the max scale value with 5 double taps.
However, all those gesture listeners are silent until you feed some touch events for them. So here is the icing on the cake:
@Override
public boolean onTouchEvent(MotionEvent event) {

  if ((event.getAction() & MotionEvent.ACTION_MASK) == MotionEvent.ACTION_DOWN) {

      cancelAllAnimations();

  }


  if (event.getPointerCount() > 1) {

      mMidPntX = (event.getX(0) + event.getX(1)) / 2;

      mMidPntY = (event.getY(0) + event.getY(1)) / 2;

  }


  mGestureDetector.onTouchEvent(event);

  mScaleDetector.onTouchEvent(event);

  mRotateDetector.onTouchEvent(event);


  if ((event.getAction() & MotionEvent.ACTION_MASK) == MotionEvent.ACTION_UP) {

      setImageToCropBounds();

  }

  return true;

}
On every touch event I check whether it’s an ACTION_DOWN or ACTION_UP event.
Let’s now imagine a case when a user drags the image out of the screen and then takes away all fingers. At that moment a check for ACTION_UP is triggered and the setImageToCropBounds() method is called. The image starts to animate back to the crop bounds, and while animation is in progress, a user touches the image again, so that both check for ACTION_DOWN triggers and the animation are canceled sequentially, and the image transformations are performed according to the user’s gestures.

In the case when there are two or more fingers simultaneously touching the screen, I have updated mMidPntX and mMidPntY values. And, finally, I passed a touch event to each of the gesture detectors.
That’s it! A couple of interfaces and the overridden onTouchEvent method are everything you need to add a groovy gesture detection to your custom view.
UCropActivity
When the library was almost ready I asked our designers to create a UI design for the Activity.
As a result, I got this lovely screen to implement:

There were also a couple things I had to create from scratch:
-
custom view to represent a horizontal scroll widget
-
custom view to represent an aspect ratio switcher
I won’t post any code here, because those are just simple custom views and you can check out the code on the GitHub page.
And here is the result:

Apart from widgets, the Activity gets all the data from the UCrop class that is designed using a builder pattern and sets up the crop view respectively.
At the moment it’s designed as-is and there is no Activity theming support. But that’s one of the goals for the next library update.
UCrop Builder
For this part I didn’t want to reinvent the wheel and followed the example of Builder implementation from the SoundCloud cropping library, revising and extending it.
If you want to crop a user profile photo and need a square aspect ratio and, let’s say, 480px maximum image size, you should call:
UCrop.of(sourceUri, destinationUri).withAspectRatio(1, 1).withMaxResultSize(480, 480).start(context);Epilogue
One of the biggest challenges I had developing this library was achieving smooth performance and UI. I had to rack my brain over trigonometry calculations until I suddenly realised that a whole set of problems could be solved just by using the Matrix.
I really like the result, but still, nothing is perfect. We will definitely be using uCrop in our projects here at Yalantis. Therefore, there will certainly be updates to come. We already have plans for the next couple of updates and even more. Why don’t we combine several libraries to pick, edit and apply effects to images? Who knows, perhaps we will? Stay tuned for further updates about this exciting project, and don’t forget to check out uCrop on GitHub!
Check out uCrop on Product Hunt. And click vote!
Rate this article
3.1/5.0
based on 422 reviews