
With iOS 10, Apple expanded Siri’s capabilities to third-party apps. Now you can enhance your own apps with voice commands to provide your users with bot-style interactions.
We’ve just finished developing an iOS application for one of our clients that integrates with Siri. The app allows clients of a consulting company consult with their managers through a voice messaging system. Here’s how it works: a user opens Siri and says: “Send a <NAME OF APP> message telling my managers that I need help.” Then the request is sent to the managers.
In this article, we’ll tell you how we integrated Siri in our app. We hope this article will serve as a useful tutorial to help you build your own apps with voice assistants.
Choosing domains
Before you start, you need to choose a domain based on the tasks that your app will perform. As described in the SiriKit Programming Guide, there are a few domains to choose from: VoIP calling, messaging, payments, photos, workouts, ride booking, CarPlay, car commands, restaurant reservations, lists and notes, visual codes (QR code support), and media.
We chose the messaging domain for our Siri integration.
Siri uses intents to propagate user actions. When a user requests an action from Siri, it sends the user’s intent, along with necessary additional information, to the handler for that intent.
Siri’s messaging domain supports three kinds of intents: send a message, search for a message, and assign attributes to a message. Each of these intents has its own protocol that has to be implemented by any handlers for that intent.
SiriKit also provides the ability to extend the default UI in the Siri window, but in our case the default UI fit just fine.
Setting up
First, we needed to create a separate framework for our app. Because Siri support must be implemented via the Intents Extension, you can’t use code directly from your project. That’s why we used the separate framework.
You can set up the framework by going to the Xcode menu bar and selecting “File–>New–>Target.” You’ll then be asked which template to use for your target. Select “Framework.”
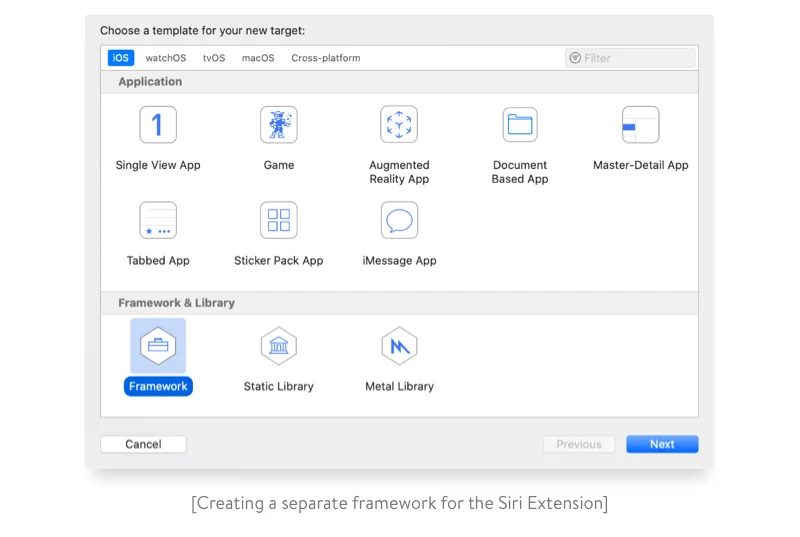
In the next window you can change template options and assign a name for your framework. Let’s call it ”Core.” Double check that your framework has the same Project and check “embed in application” field.
Adding classes to the framework
Next, you’ll need to add classes to the framework. In our case, we added classes that define the domain of user requests and send those requests to our backend team.
If you have your classes already implemented you need to move them to the “Core.” This can be implemented by removing your classes from your main target and manually adding them to the framework target. Then in your main target, you can import the “Core” framework and use your classes.
Implementing the intent handler
The most important part of integrating Siri in your app is implementing the intent handler. To do so, you’ll need to add the “Intents Extension” target to your app by selecting “File–>New–>Target” and then selecting “Intents Extension.” After that you’ll be asked to enter a name. Let’s call it “SiriIntentExtension.”
To provide the system information about exactly which intents the app should react to, we need to add some data to the “Info.plist” file of the “SiriIntentExtension”:
<key>NSExtension</key>
<dict>
<key>NSExtensionAttributes</key>
<dict>
<key>IntentsSupported</key>
<array>
<string>INSendMessageIntent</string>
</array>
</dict>
<key>NSExtensionPointIdentifier</key>
<string>com.apple.intents-service</string>
<key>NSExtensionPrincipalClass</key>
<string>$(PRODUCT_MODULE_NAME).IntentHandler</string>
</dict>
In the above code, we specified the supported intents list (which contains only one intent in our case, “INSendMessageIntent”). If you need to restrict access to intents for locked devices, you can specify a restricted intents list using the “IntentsRestrictedWhileLocked” key.
The “NSExtensionPrincipalClass” key provides the name of the class in your IntentsExtension that will decide which handler to use for a given intent. We decided to call this class “IntentHandler.”
The implementation of the IntentHandler class is pretty simple:
import Intents
class IntentHandler: INExtension {
   override func handler(for intent: INIntent) -> Any? {
       return MessagesIntentHandler()
   }
}
In the above code, we return an instance of “MessagesIntentHandler” for any given intent, because we have subscribed to only one intent type. If you need to implement support for different intents, you can verify which intent the handler is to be provided for:
if intent is INSendMessageIntent {
  return MessagesIntentHandler()
}
As you might have already guessed, “MessagesIntentHandler” is the class where everything happens. Here’s the implementation of this class:
class MessagesIntentHandler: NSObject, INSendMessageIntentHandling {
...
}
The “INSendMessageIntentHandling” protocol requires the use of “NSObjectProtocol,” so the handler inherits from “NSObject.” The “INSendMessageIntentHandling” protocol contains one required and four optional functions. You can find more information about it here. Right now, we are interested in only the four optional functions.
The first function, the optional one, is “resolveRecipients(forSendMessage:with:).” In this function, you can indicate the recipient(s) for a given intent.
Because the recipient in our case is a single entity (the server), we’ll simply accept all suggested recipients so that Siri won’t ask users to resolve the recipient themselves:
func resolveRecipients(forSendMessage intent: INSendMessageIntent, with completion: @escaping ([INPersonResolutionResult]) -> Void) {
   guard let recipients = intent.recipients else {
     completion([])
     return
   }
   let resolutionResults = recipients.map { INPersonResolutionResult.success(with: $0) }
   completion(resolutionResults)
 }
In the above code, we take possible recipients from the intent and provide a resolution result for each of them.
The next function is “resolveContent(forSendMessage:with:).” This function allows you to validate the input text. For our application, we simply filter empty requests:
func resolveContent(forSendMessage intent: INSendMessageIntent, with completion: @escaping (INStringResolutionResult) -> Void) {
   if let text = intent.content, !text.isEmpty {
     completion(INStringResolutionResult.success(with: text))
   } else {
     completion(INStringResolutionResult.needsValue())
   }
 }
Users have to authorize before they start using our app, and so only authorized users should be able to access SiriIntentExtention’s functionality. To make sure that only authorized users have access, we need the “INSendMessageIntentHandling” protocol to contain the “confirm(sendMessage:completion:)” function:
func confirm(sendMessage intent: INSendMessageIntent, completion: @escaping (INSendMessageIntentResponse) -> Void) {
   let userActivity = NSUserActivity(activityType: String(describing: INSendMessageIntent.self))
   let responseCode: INSendMessageIntentResponseCode
   if !NetworkReachability.isReachable {
     userActivity.userInfo = ["error": SiriIntentError.noInternetConnection]
     responseCode = .failureMessageServiceNotAvailable
   } else if !UserSession.hasAuthorizedSession() {
     userActivity.userInfo = ["error": SiriIntentError.notAuthorized]
     responseCode = .failureRequiringAppLaunch
   } else {
     responseCode = .success
   }
   let response = INSendMessageIntentResponse(code: responseCode, userActivity: userActivity)
   completion(response)
 }
In the above code, we check whether an internet connection is available and whether a user is authorized in the application. “NSUserActivity” is passed to the application when the app is opened. If the validation fails, we return an error and an appropriate status code. For instance, if we pass “failureRequiringAppLaunch,” Siri will suggest that a user open an app. When the user opens the app, we could resolve the “userActivity” and suggest that the user try again after authorization.
Now for the last, and primary function:
func confirm(sendMessage intent: INSendMessageIntent, completion: @escaping (INSendMessageIntentResponse) -> Void) {
   let userActivity = NSUserActivity(activityType: String(describing: INSendMessageIntent.self))
   let responseCode: INSendMessageIntentResponseCode
   if !NetworkReachability.isReachable {
     userActivity.userInfo = ["error": SiriIntentError.noInternetConnection]
     responseCode = .failureMessageServiceNotAvailable
   } else if !UserSession.hasAuthorizedSession() {
     userActivity.userInfo = ["error": SiriIntentError.notAuthorized]
     responseCode = .failureRequiringAppLaunch
   } else {
     responseCode = .success
   }
   let response = INSendMessageIntentResponse(code: responseCode, userActivity: userActivity)
   completion(response)
 }
In this function, we resolve the domain of a user request and send a wrapped message to the server. “intent.content” contains a text message recorded by the user. If our attempt fails, we send a “.failure” response code so Siri can tell the user that their request wasn’t sent.
Keep in mind that you’ll have to add the “NSSiriUsageDescription” key to your app’s “Info.plist.”
Testing
Let’s test it!
We’ll assume my app is called “Awesome,” and my “NSSiriUsageDescription” contains “For example.”
Try bringing up Siri and saying, “Send Awesome a message saying test message.” This will lead to the next screen:
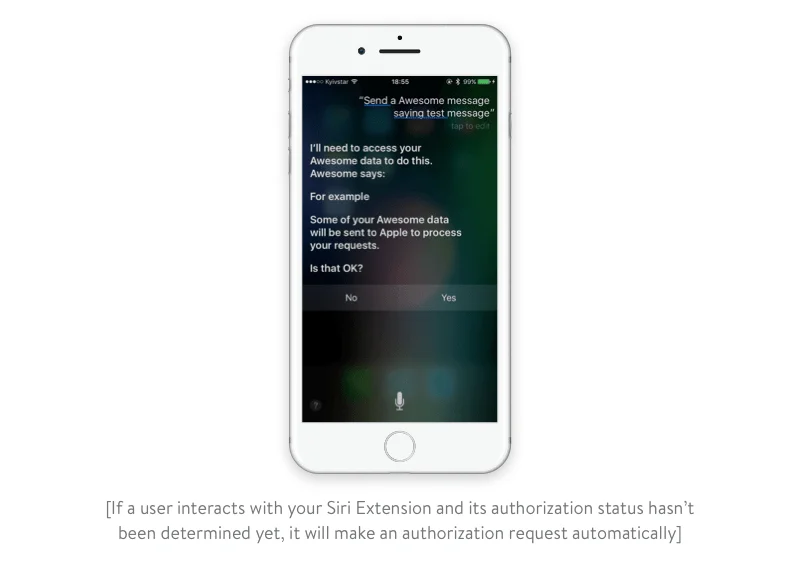
Note that you won’t see this screen if you manually request Siri usage from a user. OK, let’s select “Yes.” Now we see the next screen shown below:

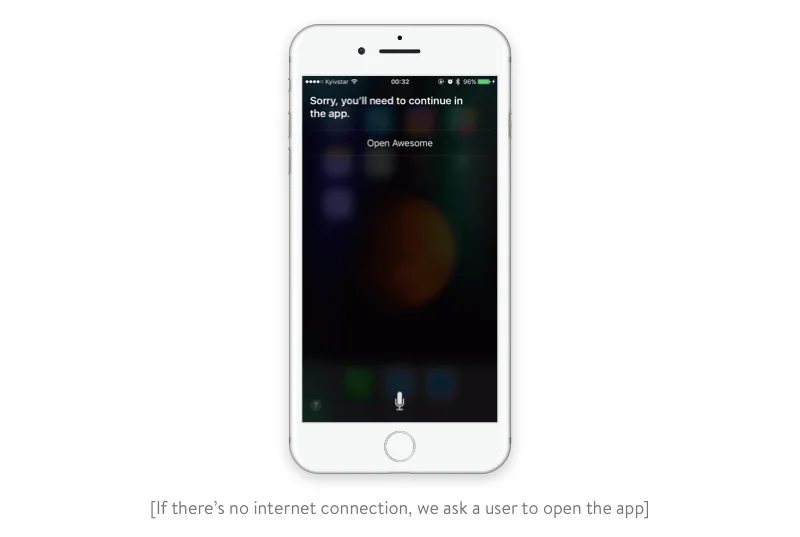
This is the part that you could customize with your own design. If you try to access this functionality without an internet connection, the first case in our validation will fire and you’ll see the screen below:
Conclusion
To finish, we wanted to note a few things to keep in mind while developing an extension like ours:
- If you use network requests, you must add your domain for both, the app and the SiriIntentExtension to the exceptions for “App Transport Security Settings.”
- As described in Apple’s docs, you can implement your own custom dictionary of app-specific and user-specific words that Siri might misunderstand. It’s optional, but you’ll be reminded about this during the Apple review process.
- You can manually request Siri Usage permission by calling “INPreferences.requestSiriAuthorization,” but if you don’t, then Siri will ask for you to do so upon first use.
- Siri recognizes your app only by its name. For instance, if you provide English and Russian localisations for your app without specifying a localization of the name, then when a user sets Russian as their Siri language, Siri won’t recognize your app and users won’t be able to send requests. To solve this problem you can provide a “CFBundleDisplayName” key for any localization with the appropriate value.
Rate this article
4.3/5.0
based on 153 reviews